Arm Virtual Hardware deployment
Introduction
This page documents the steps needed to run the Safety Island Actuation Module with a simulated Autoware environment on an AWS EC2 instance, connected over a Virtual Private Network (VPN) to the Safety Island on an Arm Virtual Hardware (AVH) Cortex®-R82 based board.
Note
All command examples on this page from the HTML document format can be copied by clicking the copy button. In the PDF document format, be aware that special characters are added when lines get wrapped.
Zephyr application build
On a local machine (validated with Ubuntu 22.04), a suitable environment is needed to build the Zephyr application. Please follow the official Zephyr documentation to set up the build environment and install the Zephyr SDK.
Clone the repository and its submodules:
$ git clone https://github.com/oguzkaganozt/actuation_porting.git
$ cd actuation_porting
$ git submodule update --init --recursive
Launch the development container:
$ ./launch-dev-container.sh
Inside the development container, build the Zephyr application for the AVH target:
$ ./build.sh
The resulting Zephyr binary is located at
build/actuation_module/zephyr/zephyr.elf
Virtual machines launch
AVH launch (Safety Island)
Deploy and connect to the Zephyr application on the AVH instance:
Note
You can deploy and connect to the ARM instance on AVH both using WEB UI or the avh.py script. The script is recommended and more convenient for automation and scripting.
In order to use the script, you need to have the .env file set up in the root directory of the repository.
You can use the template.env file as a template.
If you are using staging environment, you can leave
AVH_API_ENDPOINTas it is or for production environment, you need to change theAVH_API_ENDPOINTto https://app.avh.arm.com/api or another production environment endpoint.You can find your
AVH_API_TOKENby going to Corellium dashboard then navigate to profile/api.You can find your
AVH_PROJECT_NAMEby going to Corellium dashboard then navigate to projects.You can choose any name for
AVH_INSTANCE_NAME.This application specifically designed for aem8r64-lan9c111 flavor. So changing the
AVH_INSTANCE_FLAVORis not recommended.
Option 1: Using the script
$ ./avh.py --deploy --ssh
Option 2: Using the WEB UI
Follow the instructions of the Arm Virtual Hardware User Guide in order to create an account.
Create a Cortex®-R82 device with LAN91C111 networking, upload the
previously compiled zephyr.elf file as the custom firmware and start the
device. See the Upload Firmware in Web UI
page for details.
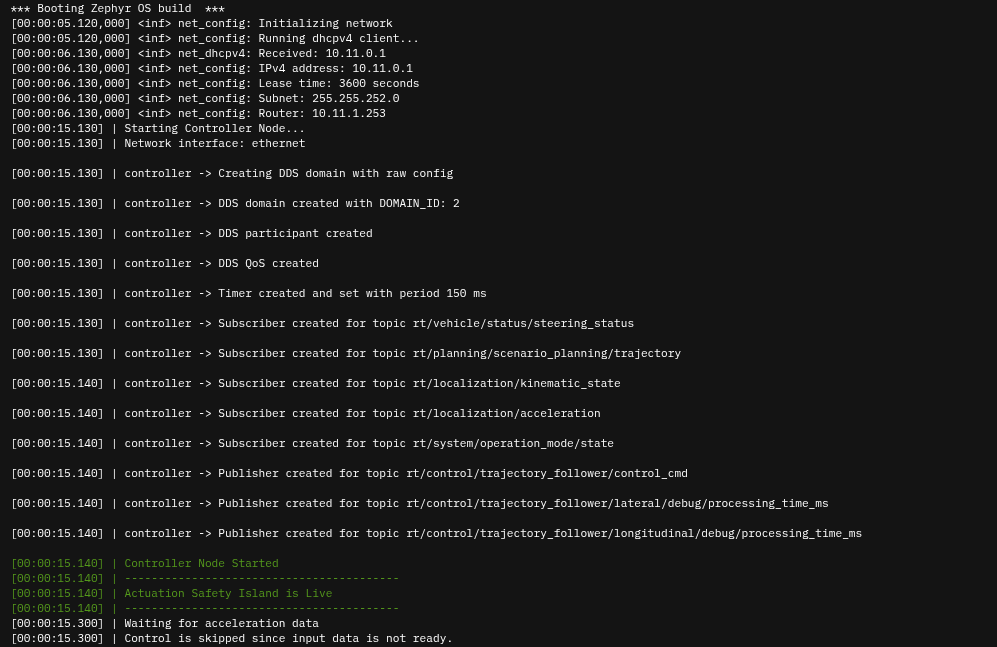
Device boot logs
You should see the logs when the device boots up in the console tab.
EC2 launch (Autoware Main Compute)
If needed, follow the Create Your AWS Account tutorial in order to create an AWS account.
If needed, read the Launch an instance using the new launch instance wizard page in order to learn how to create and configure an AWS EC2 instance.
Launch an instance:
running Ubuntu Server 22.04 on a 64-bit Arm architecture
with 8 vCPUs and 16GB of RAM on Graviton3 (type “m7g.2xlarge”)
selecting or creating a key pair for login
enabling “Auto-assign a public IP” and allowing SSH traffic from a sensible range of IP addresses
configuring 32GB of gp3 storage
Running the Demo
Read the Connect to your Linux instance using an SSH client paragraph in order to find the SSH command to connect to the instance.
Inside the EC2 instance, install Docker engine. Follow the official Install Docker Engine instructions.
VPN connection
Inside the devcontainer, you can use the script to directly connect to the Corellium VPN by running the following command:
$ ./avh.py --vpn-connect
If you check with ip a command, you should see the tap0 interface created.
Or Manually: Inside the EC2 instance, you can connect to the Corellium VPN by following the steps below: On the AVH website, in the “Connect” tab of the previously created device, use the “Download OVPN File” button to download the VPN configuration file.
Copy the repository and the OVPN file to the EC2 instance using SCP. If needed,
follow the Transfer files to Linux instances using an SCP client
paragraph for instructions on how to do that. The following steps assume that
the repository is in ~/actuation_porting and ~/avh.ovpn is the destination
path for the configuration file.
Install the OpenVPN package and use the VPN configuration file to connect to the local network of the Safety Island, leaving the VPN client running in the background:
$ sudo apt update
$ sudo apt install --no-install-recommends openvpn
$ sudo -b openvpn --config ~/avh.ovpn
The expected output ends with:
[...] TUN/TAP device tap0 opened
[...] net_iface_mtu_set: mtu 1500 for tap0
[...] net_iface_up: set tap0 up
[...] net_addr_v4_add: X.X.X.X/X dev tap0
[...] Initialization Sequence Completed
Warning
If the name of the interface created is not “tap0”, update the CycloneDDS
configuration file at demo/cyclonedds.xml to reflect it.
Launching Autoware
Navigate to the demo directory and start the Autoware container using Docker Compose:
$ cd ~/actuation_porting/demo
$ docker compose up
This will start the Autoware without actuation pipeline, which will then connect to the ARM Safety Island Actuation Module running on the AVH instance through DDS over the VPN.
Launching the simulation
After containers are running, you can open the visualizer from the link that is given in the logs OR with the link http://<ec2-instance-public-ip>:6080/vnc.html?resize=scale&password=openadkit&autoconnect=true
Set the initial pose for the ego vehicle by clicking the “2D Pose Estimate” button in the visualizer.
Set the goal pose for the ego vehicle by clicking the “2D Goal Pose” button in the visualizer.
Click the “Auto” button on “Operation Mode” tab in the visualizer.
You can follow the simulation tutorial in the Autoware documentation.